Monday, October 30, 2017

Cork Pumpkin

Good Morning All.
 
I have a lovely piece of home décor to share with you today.  As its nearly Halloween I thought I would have a play with all the corks I have collected and make a pumpkin.


I saw the idea whilst browsing Pinterest so I had to give it a go.
 
I started by gluing all my corks together in a sort of hexagon shape then I added a cork to the top to look like a stalk.

 
I then added orange glitter to the front of each cork.  You could use paint but as I didn't have any I though glitter would look very pretty.
 
I then added a some twine in a bow to decorate the stalk.

 
I then embellished my pumpkin with a few leaves and a butterfly.  The leaves are a die cut from Spellbinders called Die D-Lites All Leaves.  I cut the leaves from different types of card stock and I also got my inks out to give them a autumnal look.


The little butterfly is also a die from Spellbinders called Die D-Lies Flying Bugs.  I cut the butterfly from gold card stock.


Thanks for stopping by today and please check out the website over at Spellbinders for the details about the dies I have used.  Also there are lots of lovely Halloween and Autumn themed dies now available.


Friday, October 27, 2017

Blended Backgrounds with Fairy Magic

 Morning All.
 
The first weeks of the holidays is over and we had a busy week.  Some relatives came over from the UK to spend the week with us and my daughter and I went to the cinema to see the new My Little Pony film.
 
Now its Friday and the weekend.  I hope you have something planned?  Maybe crafty?
So if you are looking for a card challenge why not try out the Daring Cardmakers.
 
Nat our lovely host this week has picked Blended Backgrounds.
 
 So lets get your inks out and get creating.
 
 
For my background I used some distress inks by Tim Holtz and made a sunset style background.

 
I then had to used the fairy die again from Spellbinders called Die D-Lies Fairy Ariana.
I cut her from black card stock and then created a drop shadow using a bit of white glitter card stock.


The stamps I used are from a set by IndigloBlu called Nature I.
The stamp set is stunning and is perfect for creating silhouettes against a sunset sky.
 
 
Thanks for stopping by and please check out what the Design Team created over at the Daring Cardmakers.


Thursday, October 26, 2017

Bubbly Funk Through The Letter Box

Morning Crafters.
 
Today I am sharing another creation with you using the Bubbly Funk Through The Letter Box craft box.


I created this little cat shaker card for a very good friend who is also a crafter.
 
This time I wanted to make good use of the bag of sequins you get in the kit.
 
 
To make my card I first cut a square of black card and then a square of white card which was slightly smaller and glued this to my base card.
 
I then took some pretty yellow paper and trimmed this to fit.  I then added a strip of washi tape from the kit along with some of the pretty spotty ribbon.


To make the shaker element I used the large tag from the kit and die cut a little cat aperture into the centre.  I then die cut several circle frames and glued them underneath with a piece of clear plastic over the top to keep my sequins inside.  I know a lot of crafters use foam strips or squares when making shakers but I find this way a lot easier and there is no way you are going to loose the sequins out.

 
I then added the little wood chip banner and stamped my greeting onto the top.
To finish I added some of the lovely gems.

 
Thanks for stopping by and please stop by the Bubbly Funk Blog for more lovely inspiration from the Design Team.


Monday, October 23, 2017

Spellbinders Club Kit Craft Morning

Hello Crafters.


I have a different Spellblogger post to share with you today.  I got my crafty friends involved in this one.  Last week I had a crafty date at my house where we had a play with one of the club kits available from Spellbinders.
 
This is the kit we crafted with.

In the kit you get enough supplies to make at least 10 cards and a die set.
 
Here are a few pictures of what my friends made.
 
 
My friends each took a few elements from the kit and made there own design.
 
Maria used lots of the lovely papers and one of the die cut shapes to make her card and finished with the beautiful bow made with the organza ribbon which is included in the kit.

 
For this one Julie used the die set and cut out these pretty flowers in pink and black and also added one of the fabric flowers to her card.
 
The ladies even made these cute little gift boxes


Karen also used the die set to make her flowers and added the pretty butterfly along with some enamel dots.
 

Here is my card.  I used the hexagon die, some of the stickers, card stock and enamel dots to make my creation.
 
I used the hexagon die and cut out the shapes using different pieces of card stock and patterned paper.  I then made a pattern on my card and added a few of the stickers.


Each project was crafted with elements from the kit which includes, papers, card, ribbon, gems etc...
 
This is such a lovely kit from Spellbinders.  The colours are so pretty and it has just the right amount of sparkle.
 
The only thing you need to add is a paper trimmer and some wet glue as the kit even comes with foam squares and sticky dots.
 
Thanks for stopping by today and have a lovely week.
 
xXx
 

Friday, October 20, 2017

Country or City

 
Morning All.
 
Its the last day of term here in France for two weeks.  My daughter is very excited as we have a movie night planned for this evening and also its Halloween soon.
 
The school usually have a little coffee and cake event where the kids all dress up so I must come up with a spooky ideasfor my cupcakes.
 
So back to todays post which is for Daring Cardmakers.  Our lovely host this weeks is Miri. 
Miri would like to know if you are a country or a city kind of person and then show us what you like about living there in your creations.
 
Can you guess what I am?
 
That's right. Country.
 
I grew up in the countryside in England and now I live in the beautiful countryside of Brittany, France.
 
As we had a little surprise hatching of new chicks I thought I would feature a cockerel on my card.
 
 
To make my card I started with a piece of black card stock and trimmed it to fit my card front.  I then took a piece of grey card stock and trimmed this slightly smaller.  I then stamped the pretty flowers to the bottom and top which is from a set by Stampin Up called Wood Words.

 
I then placed the grey card stock through my Spellbinders Platinum machine and used the embossing folder from Spellbinders called Chicken Wire by Donna Salazar.

 
I then used the same stamp and die from Stampin Up to make the cockerel and also I used the flowers again but this time coloured them in using some promakers.  I then added a little gingham ribbon to finish.
Gingham and country are just made for each other.
 
Thanks for stopping by and I can't wait to see if you are a city or a country kind of person.
 
Please stop by the Daring Cardmakers blog for more lovely inspiration and I will see you there.
 
Have a lovely weekend.
 
xXx


Wednesday, October 18, 2017

Bubbly Funk Through The Letter Box

Hello Crafters.


Hopefully you have seen lots of posts on my Facebook page regarding the Through The Letter Box from Bubbly Funk.
 
So here is my first project using the lovely new Bubbly Funk Through The Letter Box craft box and I have also included lots of pictures on the post to show you the amazing contents.
 
Once you register each month from Bubbly Funk you will be sent a box full of beautiful craft items which is the perfect size fit to go through your letter box.
 
Here is how it will arrive to you.  All neatly package in these lovely paper bags.
 
 
I good sized bag filled with lots of lovely sequins and beads.

 
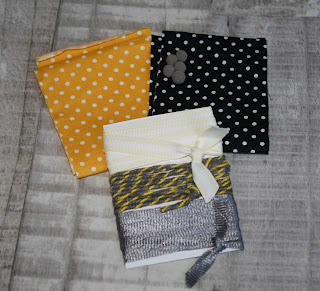
This is the contents of one of the bags.  Lots of stunning ribbon, pom poms and fabric.

 
Another bag contained some pre cut shapes, washi tape and a tag.

 
Lots of chip board shapes and my favourite crafting item,  gems.  The gems are on strips so you can either use it as it is or cut individual ones off.

 
This little spotty yellow bag contains your mystery surprise.

 
So here is my first project.
 
I made a little gift bag.
 
To make the bag I used an A4 sheet of black card. 
I scored on the long side at 3 1/4", 5 1/4", 8 1/2" and 10 1/2"
and on the short side at 2" which is the bottom of your bag.
I snipped up the score lines until they met the 2" score line as these fold in to make your bottom.
Then I glued the box together and slightly pinched in the top.

 
I used some of the pre cut shapes and the pretty black swirl and glued them to the front of the bag

 
I then added a few of the gems.

 
 I then finished my bag with some of the gorgeous spotty ribbon from my mystery surprise to close the top.

 
Thanks for stopping by and please pop over to the Bubbly Funk website and blog to check out more ideas created by the Design Team.


Monday, October 16, 2017

How To Catch A Fairy In A Jar

Moring Crafters.

Don't worry I haven't really caught a fairy in a jar as that would be cruel. But I will tell you how I made this really pretty luminary using a fabulous die from Spellbinders.


First of all you will need an empty jar.  I washed and cleaned off the label and removed the lid.
 
Then I cut out my fairy in black card stock  I used  Fairy Ariana from Spellbinders.  Then glue your fairy to the inside of your jar.
 
I then took some white tissue paper and wrapped this around the jar taking care not to rip the paper.  To stick the paper cover the jar in white PVA glue and also apply a coat to the front. 
 
Wait for the glue to dry then add your embellishments.  I added some white glitter to the outside of the jar to add a bit of fairy sparkle. I also wrapped some string around the top and added a little flower but you could add perhaps some die cut leaves or pinecones etc...
 
Place a battery operated tea light inside and enjoy. 


There are 3 other fairies in the range and all of them would look so pretty for this project.  You can check them out HERE.

 
This project would work great with any silhouette style die.  Some of the Halloween dies from Spellbinders would look lovely to create a spooky glow.
 
Thanks for stopping by today.


Friday, October 13, 2017

Pastel Rainbow

 
Happy Friday Crafters.
 
Its nearly the weekend so that means lots of crafting time but before the weekend gets started lets take a look at this weeks challenge over at Daring Cardmakers.
 
Our host this weeks is Sharon. 
 
Sharon would like to see a PASTEL RAINBOW on your card.
 
So this week I decided to make a card featuring some pastel bunting and made a cute baby card.
 
 
I started with a blue piece of designer paper and trimmed it to fit my card blank.
 
I then cut the bunting using a die from Trimcraft.

 
I then used the Fiskars cloud squeeze punch for the fluffy clouds and added a few sequins.

 
I then stamped this very sweet sentiment to finish my card.
 
A super sweet new baby card ready to send to the UK.
 
I just want to say big congratulations to Craig and Sarah on the birth of your beautiful baby boy.
 
Also congratulations to my cousin Mandy and her husband Ed on becoming Grandparents.
 
Thanks for stopping by today and please stop by the Design Teams over at Daring Cardmakers to see their pastel rainbow creations.
 
xXx