Monday, May 28, 2018

Sew Sweet

Hello everyone and welcome to anther weekly Spellblogger post from Spellbinders.


I am in love with this die set from Tammy Tutterow at Spellbinders called Sweet Treats from the Sew Sweet Collection.

The set comes with lots of lovely dies in order to create this bird and his little house.


I decided to create a shaped card using the scalloped edge die that comes in the set. 


I then created my background using the stitched edge square die and used some blue and green inks and blended them on to my card.

I cut all the elements I needed to create my little bird and house and added them to my card.

This set is just fabulous and crammed full of lots of lovely dies including the little flowers and leaves.


I finished with a greeting from the same collection called Sew Sweet Sentiments.  I blended two shades of pink ink onto the die cut sentiment to create a little ombre effect.


Thanks for stopping by today and please check out the website over at Spellbinders to see the full collection from Tammy Tutterow called Sew Sweet.


Friday, May 25, 2018

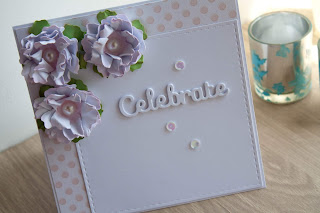
Handmade Flowers


Happy Friday everyone and welcome to another fun challenge from Daring Cardmakers.


Its my turn to host this week.


 I have been having some work experience as part of my French course and I have been working along side a fantastic lady who makes paper flowers. Please check out some of her wonderful work over at Arty Abi. 


So I would like to see handmade paper flowers on your cards. This could be a punched flower or die cut but it has to be handmade.


I went for a fresh look with my card and thought it would be perfect perhaps for a wedding or an engagement.  I made three handmade flowers using the In Bloom punch from Fiskars.

I punched out several flowers from white card stock and inked the edges and the centres in pink.  I then sprayed them with a little water and scrunched them up.  I opened them out and added a brad to hold all the layers together.  I scrunched them up some more to get the look I wanted and left them to dry.


Once they were dried I added them to my card with a pearl in the centre.


For my greeting I used a die from Spellbinders called Simply Said Phrase Two.  I cut out several layers and glued them all together which made the sentiment stand out better against the white.

I then finished with a few sequins.

Thanks for stopping by today and please check out the Design Team over at Daring Cardmakers to see their wonderful handmade flowers.

Have a great weekend.

Thursday, May 17, 2018

Beep Beep

Hello everyone.


Does anyone else struggle with male cards or even cards for the youngest in our lives?  I do.
So this week I have made a card with my youngest in mind using a stencil and some of my own stash.  If you check out the Bubbly Funk Shop there are lots of lovely stencils to choose from to add to your projects.
 
 
To create my card I used this tyre track stencil and I just inked through it using some distress inks onto kraft card stock. I then added some die cut letters and these cute little cars which are available from Spellbinders.  The die set is called Little Guy and also comes with a train and a truck.
 
 A very simple card which I could make quickly and create my own background.
 
 
I thought this card was perfect for my little boy or even my husband as they both love to sit and watch any form of motor racing on the TV.

 
Thanks for stopping by today and please stop by the Bubbly Funk Shop to check out the full range of stencils and also all the other yummy craft supplies.


Monday, May 14, 2018

Flower Garden Mini Shadow Box

Hello crafters.
 
I have been having a playing with some more lovely new dies from Spellbinders and the Flower Garden Collection by Sharyn Sowell.
 
 
To make this little hanging decoration I used the Tiny Shadow Box Die.
 
Its really easy to put together then you can just add your own decorations.


I added a little piece of designer paper to the inside and a little heart with my daughters initial on it.  I thought it would like very cute personalised.

 
I then used the little flowers that also come in the die set.
I also added a few enamel dots.
After I made this I started thinking about Christmas and how lovely these would look decorated for your tree.  But as its only May I think I will wait for the weather to change before I start on Christmas.  Although I do love Christmas crafting.

 
Thanks for stopping by today and have a lovely day.


Friday, May 11, 2018

Busy Bees

Hello everyone and welcome to another challenge over at Daring Cardmakers.
 
This weeks challenge is hosted by our lovely Enfys who would like to see something bee related on your creations.
 
I couldn't wait to get started with this as I wanted to play with one of my favourite flower dies from Spellbinders called Shapeabilities Create A Sunflower Die.
 
On the packet there are easy to follow instructions as to how to create the flower.
 
 
I started with a square of white card stock and I added a little stencil detail to look like honey comb.
 
I then created a little ombre effect on my die cut sentiment using the same coloured ink as the background.
 
For the sentiment I used the very lovely Sew Sweet Sentiments by Tammy Tutterow at Spellbinders.


I then added my sunflower and a few little blossom flowers using the Sweet Treats set also by Tammy Tutterow at Spellbinders.

 
And to finish my card I had to add a little busy bee using the Flying Bugs Set also from Spellbinders which I cut from gold card stock.
 
Thanks for stopping by today and please check out the lovely insprtion from the Design team over on the Daring Cardmakers Challenge Blog.
 
Have a great weekend.
 

Tuesday, May 8, 2018

Playing With Stencils.

Good morning.
 
 
Today I have been playing around with stencils.  There are lots of lovely stencils in the Bubbly Funk SHOP.
 
I played with a pretty floral one.  I pressed some ink onto my craft sheet and sprayed it with some water.  I then took a square of white card and placed it over the area with the ink and pressed lightly.  The ink then transferred itself to my paper and created a lovely background.  I allowed this to dry and then used my stencil to added more detail.
 

I used a darker blue with the stencil and after this had dried I sprayed the design with some pearl ink mixed with a little water to give a shimmer effect.
 
 
I then added a strip of black card and added a die cut greeting in white card stock.
 
 
I finished my card with some sequins.  I do love my bling and a card isn't finished until I add some sparkle.
Thanks for stopping by today and please check out the Bubbly Funk Shop for more lovely stencil designs.


Monday, May 7, 2018

Party Favours

Hello crafters and I hope you had a lovely weekend.
 
We had some smashing weather here in France and we spent most of it outside in the garden.
 
Today I am sharing with you another project I made for my daughters birthday.  This time its party favour boxes.
 

I made thess square block boxes using a contour steel rule die called Giving Makes You Happy.  Its a fabulous size die and with it been a steel die I could cut more than one box at a time.

 
The boxes were so easy to make.  You just had to cut out the two parts and glue them together.

 
It was the decoration of the boxes that took a while as I had to glue all these tiny squares on.  In the end I asked my daughter to help as I had no idea what the blocks are in the game.


They were a hit with my daughter and all her party guests and I filled each one with chocolate and a little gift.  They are a great size as you can get a lot of treats inside them.
 
The finished box is 3" x 3" x 3".
 
Thanks for stopping by today and have a lovely day.


Please use code SBSAVE10 when checking out your basket over at Spellbinders to get 10% off your next order.
 
Save 10% OFF your next purchase. Must use provided coupon code at time of purchase. If code is not used at time of purchase then order will be ineligible for discounted rate. Offer good only on products purchased at www.spellbinderspaperarts.com. Offer is one time use; individual consumer use only; not for distribution; Clearance is excluded, excludes tax & shipping; not valid on any previous web, phone or retail purchases; cannot be redeemed for cash; cannot be combined with any other offer; void where prohibited. Offer expires 12/31/2018.


Friday, May 4, 2018

May Elemental Inspiration

Its Friday!!!
 
I am so looking forward to the weekend as my husband has been working away all week and I have missed him and so have our kids.  Its so sweet when the kids FaceTime him and my youngest gives the screen a kiss and a cuddle.
 
As its the first Friday of the month its time for an elemental inspiration challenge from Daring Cardmakers.
 
Remember to pick three elements from this very gorgeous image.
 
 
I picked the ombre colours, stars, a sentiment and my layout is similar to the bottom left hand image.
 
 
I started with a square of white card stock and used two different shades of pink to blend my background.  I then used an embossing folder to create some texture. 

 
I used the very gorgeous die set from Tammy Tutterow at Spellbinders called Sweet Tweets from the Sew Sweet Collection.  I used the branch and some of the little flowers.  I wanted it to look like pretty blossom.  I then added in a few die cut stars.
 
For the little flowers I added a little bit of pink ink to the petals and I used some flower stamens for the centres.

 
I  finished with this gorgeous sentiment stamp from Dovecraft available online at Craftelier.
 
Thanks for stopping by today and please check out the dies I have used over at Spellbinders where you will find the full collection from Tammy Tutterow called Sew Sweet.
 
 
Have a lovely weekend.