Monday, February 26, 2018

Spring Time Bird House

Hello Crafters.
 
Its the school holidays here is France and its very cold but at least the sun is shining.  I have a bright and cheerful project to share with you today using dies from Spellbinders.
 
 
I have made a book folded bird house.  There are lots of great tutorials on the internet with fabulous step by step instructions.  If you can make paper aeroplanes you can make one of these.  This is a great project to try if you are just starting out with this craft.  I have seen some stunning pieces and also books folded into words.
 
 
Once you have completed your bird house you can start to decorate it.  First I added some pretty green lace to the bottom.  This also helps to hold your bird house in place.
 
I then used the Create A Sunflower Die from Spellbinders and I made three in different colours.
 

I also used the Die D-Lites Flying Bugs set also from Spellbinders.  I cut these out from gold card stock and glued them to the bird house.
 
 
I also added a few sequins to finish.  A project is never finished until I add a little sparkle.
 

Thanks for stopping by today and please check out the website over at Spellbinders for full details about the die sets I have used on todays project.


Friday, February 23, 2018

Stenciled Green

Good morning crafters.
 
Its challenge time at Daring Cardmakers.
 
Svenja is our lovely host this week and would like you to use stencils on your projects and feature some fresh greens.


Using stencils is a new technique for me but I had loads of fun.
 
I started by mat and layering some black and white card stock.  I then used a hexagon shaped stencil and used my sponge daubers to apply two different shades of ink.
 
 
I then stamped over the design using this pretty flower stamp and added a greeting using stamps from Stampin Up.

 
I then added some little flying bugs cut from gold card stock using the Die D-Lites Flying Bugs set from Spellbinders.

 
I then finished my card with a few iridescent sequins.

 
A clean and fresh card from me today with just a hint of Spring.
 
Thanks for stopping by today and please check out the Design Team Blogs over at Daring Cardmakers for more lovely Spring Green inspiration.
 
Have a lovely weekend.


Monday, February 19, 2018

Spring is in the Air

Good morning all.


Anyone else sick of all this damp dark weather?  I can't believe how much rain we have had here in France over these last few months.
 
I am now looking forward to the arrival of Spring and you can see little hints in our garden.
 
So todays card is Spring inspired.
 
 
I started by creating a circle stencil to create the cloud back ground.  I used the cloud from the Die D-Lites Flight 2 set and used this as a mask to ink around the edges to create my background but taking care to stay inside the circle. I also added a little green ink to look like grass.
 
I then added a little detail by using the pierced circle die from the Nestabilities Celebrations Pierced Circles set to frame the cloud back ground.
 
 
I then used the Die D-Lites Spring Time Set to cut out the bird, bird house and flowers.  I also added a few die cut clouds from the Die D-Lites Flight 2 set.

 
I used the little banner than comes in the set to stamp my greeting in blue ink.
To finish I added a few sequins.
 
Thanks for stopping by today and I hope my card has cheered you up as Spring is on the way.
 
For all details about the dies I have used on todays project please head over to the Spellbinders Website.


Friday, February 16, 2018

Time For A Break

Good Morning.
 
I am loving this weeks challenge over at Daring Cardmakers which our lovely host Enfys has set.
 
TIME FOR A BREAK
 
For this weeks challenge please include on your creations something you would eat or drink at your morning break.
 
I am now two weeks in on my French course and I look forward to break time and coffee every day.  My brain needs a rest and a hit of caffeine.
 
I made my card simple as I thought perhaps it would be good for a male card.
 
I started by layering up some designer paper and then used my favourite little to go coffee cup die from Spellbinders called Hipster One from the Die D-Lies Collection.
 
I cut the cup from white and kraft card stock and  then cut the coffee sleeve in the same papers as my background. 
 
 
I also die cut a little cup cake using the Die D-Lies Sweet Set and I added a little red sequin to look like a cherry.

 
I stamped my sentiment using a set I received in a craft magazine a while ago and finished with a few more sequins.

 
Please stop by the design team blogs over at Daring Cardmakers for more lovely inspiration.
 
Have a lovely day.


Monday, February 12, 2018

Weekend Grill

Good Morning Crafters and Spellbinder Fans.
 
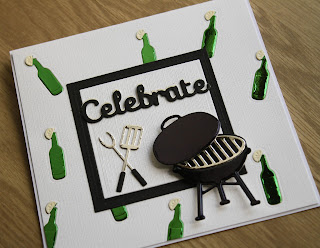
I have this fun BBQ project to share with you today using this fun and fabulous new die from Spellbinders called Weekend Grill.
 
 
I started with a square piece of textured white card and I randomly cut into it using the little bottle from the die set.  I decided to create my own background using the dies from the Weekend Grill set.
 
 
I then cut the bottles out again but this time from green mirror card stock and placed these back into the negative space of my background.  From the bottles that were cut from the background I cut off the little lemon slices and glued these on as well and coloured each one with a yellow promarker.

 
I then mat and layered some black and white card stock to create the centre section using the 6x6 matting basics die.

 
I cut the BBQ, grill and tools from black and silver mirror card and added these to the card.

 
I then finished my card with a sentiment also cut from black mirror card stock using the Simply Said Phrase Two die set.


A great card and die set for the men in our lives.  My husband loves to BBQ even in the winter as we have the gas BBQ set up in the shed for all weather use.
 
Thanks for stopping by and please check out the website over at Spellbinders for details of the dies I have used on todays project.


Friday, February 9, 2018

Cosy Home

Good morning crafters and happy Friday.
 
Who else likes a cosy home?  I do.  I am always on the look out for little items to make my home more inviting and I usually end up buying some kind of light.  I bought a lovely light the other day which is in the shape of a house and reads "home is where the heart is" and the letters light up.  Its fab.
 
This now leads me to this weeks challenge at Daring Cardmakers which Miri has called "cosy home".  Miri our lovely host would like to see a home, house or even some buildings on your card this week.
 
I took inspiration from my favourite film.
 
 
I started with a square of yellow card and embossed this use the  embossing folder called Picnic from Tammy Tutterow at Spellbinders.  I wanted the background to kind of look like the yellow brick road.  I then added a tiny bit of tea dye coloured ink to highlight the details.

 
Next I die cut the letters from black card stock using the Alphabet Die Set of the Month from Spellbinders. 

 
I wanted to added some cute little details to my card so I used the Die D-Lites Spring Time set from Spellbinders for the bird house, blue bird and flowers.
 
I also needed to include a rainbow just like the song from the film so I used the Die D-Lites Unicorn Fantasy and cut out the clouds from the set as well.
 
I then added a few sequins to finish and a little nod to the ruby slippers.  Can you see it?  Its the centre of one of the flowers.  I used some red glitter card.

 
Thanks for stopping by today and please check out the blog at Daring Cardmakers for more beautiful inspiration from the Design Team.
 
Have a great weekend.


Thursday, February 8, 2018

Home décor hearts

Hello Crafters.


Its getting close to valentines day so I have another sweet little heart project to share with you using the contents from the "Love Is" box from Bubbly Funk.


To make this project I used the two large chip board hearts, the love word and some of the beautiful gingham ribbon from the box.
I started by inking up the hearts using some tea dye coloured ink and I then stamped in black ink some pretty flowers onto each heart.


I then added the ribbon to the inside of the hearts and glued them together.  Next I coloured in the stamped image using a tiny bit of wink of stella as I do love my sparkle.


Next I decorated the "love" chipboard words.  I covered the letters in clear versa mark ink and used some red glitter embossing powder.  I heat set this and did this a few more times to make sure I had a good layer.  I then glued the word "love" on to my heart.


A beautiful little love token you can gift to someone of keep to decorate your home.
Thanks for stopping by and have a lovely day.
 
Please stop by the Bubbly Funk BLOG for more beautiful projects using the "Love Is" box which you can order online from the Bubbly Funk SHOP

Monday, February 5, 2018

Jolly Robot

 
Hello Friends and Crafters.
 
I have more Die D-Lites from Spellbinders to share with you today.
 

I have created a little project using this very cute Robot.  This die is so much fun.  It comes in a set of 3 different styles of Robot, 3 different leg options and 3 sets of arms.  So you can have lots of fun changing his arms and legs etc...


I started with my background and just added some strips of designer paper and a bit of glitter washi tape to create these fun stripes.

 
I then created a frame using the 6x6 Matting Basics and mounted this on to some foam squares.
 
I then had to decide on which body, arms and legs to added to my Robot.  Once I cut these bits from silver foil card I ran them back through my Platinum machine with the embossing mats to create all the robot details.

 
I then added a few star sequins from my stash and finished the card with a die cut sentiment from the Shapeabilities Simple Said Phrase Two set.

 
I loved this little Robot die so much I created a matching gift box just so I could create another jolly little fella.
 
A fun card for all ages.


Thanks for stopping by today and please check out the website at Spellbinders for the full Die D-Lites Range.


Friday, February 2, 2018

February Elemental Inspiration

Hello everyone.
 
Its my turn to host the challenge over at Daring Cardmakers and as its the first Friday of the month its time for a new Elemental Inspiration challenge.
 
I have picked the image below and perhaps it will help you get inspired for valentines.
 
Please remember to pick 3 elements from the image and hop over to the Daring Cardmakers Blog and link up your entry.
 
 
For my card I picked the colours, flamingo, foil, heart and letters.


I started by creating my layout with some designer paper from Stampin Up.

 
I then die cut this little flamingo using the Shapeabilities Tropics Wild and Free Die Set from Debi Adams at Spellbinders.  I then coloured the flamingo  using a little bit of ink.

 
I cut out some letters to make the word "LOVE" using the Alphabet Die Set of the Month from Spellbinders.  I cut the letters using foil and glitter card.  I then added a couple of stickers from the June Card Kit of the Month also from Spellbinders.  I love this Alphabet Die Set as you can create any sentiment you want and the simple look of the font is fabulous.

 
I hope I have inspired you and Valentines doesn't have to be hearts and flowers, it can be flamingos instead.
 
Thanks for stopping by today and please check out the Design Team blogs over at Daring Cardmakers for more fabulous inspiration.